Tuesday, May 26, 2015

I got a life time of knowledge

Have you ever wondered why when you pick out paint colors, it looks like the perfect gray color in the store and straight up purple on your walls? Here's why...

LIGHTING!!! Lighting is so so important. Before you even pick the color, you have to factor in how much natural light the room gets. Other random factors- Flooring. If you have a whole house full of cherry wood, your paint colors will reflect it, making everything look slightly pink. If you have a ton of windows and a forest of green out the windows, the green tint WILL change the colors in the room. Fortunately, changing out the light bulbs can balance out any of those factors. The best situation would have a ton of natural light and a mixture of layered light (recessed, overhead, task, etc)

That being said, if you live in a cave, you can easily simulate that scenario. Picking out the light bulbs for the space can be a game changer in regards to color for your walls. I'll break it down for you...

Incandescent bulbs- are most commonly used. They're cheap and available pretty much anywhere. They also have a warm glow, leaving a yellow tint on paint colors. This bulb will make your whites appear cream and your blues appear green, etc. Cool colors look horrible with this type of bulb.

LED-... what am I a Rockefeller?

CFL's- like incandescent but last longer. Leaves a warm glow. the slight down side... these bulbs contain chemicals that can eat through your skin if broken. Buuuuuuuut, they're RECYCLABLE! So that totally makes up for it, right? ;) DONT GOOGLE IT. THE IMAGES ARE DISTURBING.

Fluorescent- We all know these from cold office buildings. These generally leave your paint looking blue or green although they are manufacturing some now that give a warm tint. They can't be put on a dimmer but I have 4 kids so romance is not an option anyways.

Halogen- These bulbs are the only bulbs I buy. They simulate the closest light to "natural daylight" and don't corrupt your paint color choices as much as the others do. 

So before you get all mad and change your paint color for the 18th time, try changing the light bulbs in your space. I promise it will dramatically affect the color of your paint. 

Also, here's a pretty picture of my old kitchen and the antique chandeliers I used above the island. Because I can't do a post without a photo. Note the natural light that was EVERYWHERE in that house. I miss that. Sniff. Oh, and by the way, the paint color here in called chocolate froth from Home Depot. I think it's a behr color. It was the perfect greige for a home with a ton of natural light. 


Thursday, April 23, 2015

Flea Market tactics

If you're from Arizona, it's likely you haven't been to many flea markets. Personally, I'm so glad it's gotten more trendy here because I love them. Like, a lot. So, I thought it appropriate the week before one of the biggest flea markets in Az, Junk in the Trunk Vintage Market, to do a post with the method to my madness for a successful shopping trip.

First things first. Make a list of items you hope to find or things you need for a current project. For my ADD scatterbrain, this is absolutely crucial. I tend to just get overwhelmed (especially in large crowds like at JITT) when there's so much to look at. It helps me focus in each booth and also helps me not spend as much. This obviously excludes the love at first sight, have to have with no where to put it, great pieces that are always at JITT. Here's my list of items I'll be on the lookout for next weekend.


Now, and this is crucial, don't forget a wagon/ basket/ stroller/ husband to carry around all your smaller purchases. JITT gives you tickets and hauls away your bigger items to be loaded later but they don't do that for smaller items. I carry and cross body bag for really small items and push something similar to THIS for the impossible to shove in a purse items.


If you forget this step, you'll probably be hating your life and looking as ridiculous as this guy. Which is me after every trip to the grocery store. I'd rather dislocate my arms than walk out to my car twice. 


Lastly, bring 2 or 3 water bottles because spending all my husbands money is hard work, amiright? And remember that not all vendor accept cards so bring an appropriate amount of cash. That also helps diminish the paper trail back to the hubby. ;)

I'll be doing a post on IG spotlighting my top 10 favorite vendors and their booth numbers soon. Stay tuned!


Saturday, April 11, 2015

DIY marble cutting boards and cake plates

I promised this post on Friday. It's only Saturday so... that goes in the win column. As some of you know from following me on instagram, my husband and I recently finished a project using some countertop remnants from my last home. I installed carrara marble and love love loved how it looked.  I had a small piece left over so I hoarded the extra piece in my garage until I could come up with a way to use it.

While at perusing world market one day, I saw these babies...


And these from wayfair. Hello nurse.


And knew exactly what I wanted to do with the remnant. I was scared to tackle this project because stone is so hard. In my brain, I imagined pieces chipping off and flying into my eyes and being blind for the rest of my life. Which is obviously a reasonable fear. So I googled how to cut your own marble and found a number of ways to do it. What we ended up using was a mixture of an angle grinder with a masonry wheel and a jig saw with a diamond blade. I traced a few patterns on the marble using a couple different sized bowls and cutting boards that I already had.


The diamond bit was purchased at Home Depot in the tile section. When I asked where I could find it, the guys at home depot had no idea what I was even talking about. Then again, one day I asked where a speed square was and some dude said they didn't have it. Uh... ok. Does this bother anyone else? I know men are proud and junk but if you don't know, just say it. Ugh. So anyways, I wandered around until I could find it myself.

The angle grinder was perfect for the straight sides and the jig saw blade worked perfectly for the round parts and corners.


The jig saw worked exactly like it does with wood, just took way longer. The main thing I learned was to go slow and keep it wet. The diamond blade cuts way better when it stays wet. So we just poured a little water from a bowl as we went.


Sorry the picture sucks. I was trying to show the water, the jig saw, and the tile while taking a picture and I'm pretty sure there was a kid tugging on my leg for me to push play on a movie or something. Anyways, we just poured a tiny bit of water while we were cutting and it worked way way better. After the forms were cut out, I just sanded down the edges with a sander like regular wood. It worked like a charm.


I glued the round cut outs to a few candle sticks I bought from Target. Here they are in all their glory. I love how they turned out. I had some fun taking pictures of them at my friend Kalli's house. She has a plethora of awesome accessories at my disposal. Here they are in her gorgeous kitchen.


And here are the cutting boards. I was so glad to be able to use my left over marble and do a project that intimidated me. It's so fun to learn new things. Now I can say I've cut marble. I've also won a state championship and helped deliver a breach calf. But those are stories for a different time. If you have any questions, feel free to ask away!

Sunday, December 28, 2014

DIY pine plank wood flooring

My sister is in town and she is letting me use her computer. Because apparently I'm 17 and completely irresponsible with mine, wherever it is/ may it rest in peace.

I am about to explain in full detail as per request the process we took to lay our own wood flooring planks. Let me preface it first... If you are a perfectionist, these floors are not for you. Real wood floors shrink and swell over time and with the weather. Yes, there are small gaps between the planks in some parts that smashed up gold fish get into and I have to vacuum out. We did our best to avoid the gaps when we were laying them, which I will explain later, but it's still a clean freaks worst nightmare. And the pine is soft so if you're not going for that farmhouse distressed to hell look, move on to a laminate. For what I wanted though, these floors are perfect. And it's all about me. Me Me Me. Just kidding. Kinda.

So, on to the good stuff. Because we layed them over concrete, we had to rip out the old flooring which was mostly tile and prep the concrete to glue down a 3/4" plywood sub floor. That was our favorite part, as evidenced by this photo I took for IG.


NOOOOOOTTTTT! Scraping off thin set sucked. Good thing my husbands best friend Andy came to help. Especially when we got to that mesh tape tile layers use over cracks. I'm pretty sure that crap was invented by Satan himself to drive remodelers crazy. We tried a number of different things (I'm talking like 10 from floor grinders, to hand scrapers to a jack hammer with a small blade, etc) and found that a jack hammer and huge floor scraper rented from Home Depot was the easiest way to get it all up. Talk about back breaking work. In fact, maybe just pay someone else to do this part. ;)

Anyways, once the concrete is cleaned up, you then spread a bunch of flooring glue around and lay your plywood sub floor. We used 3/4" plywood with tongue and groove joints. You have to buy nails made to penetrate concrete to nail the sub floors down in the corners. And then nail them harder than you've ever nailed anything before. Ha. This only applies to homes with a concrete slab foundation like EVERY SINGLE HOUSE IN AZ. So dumb. 


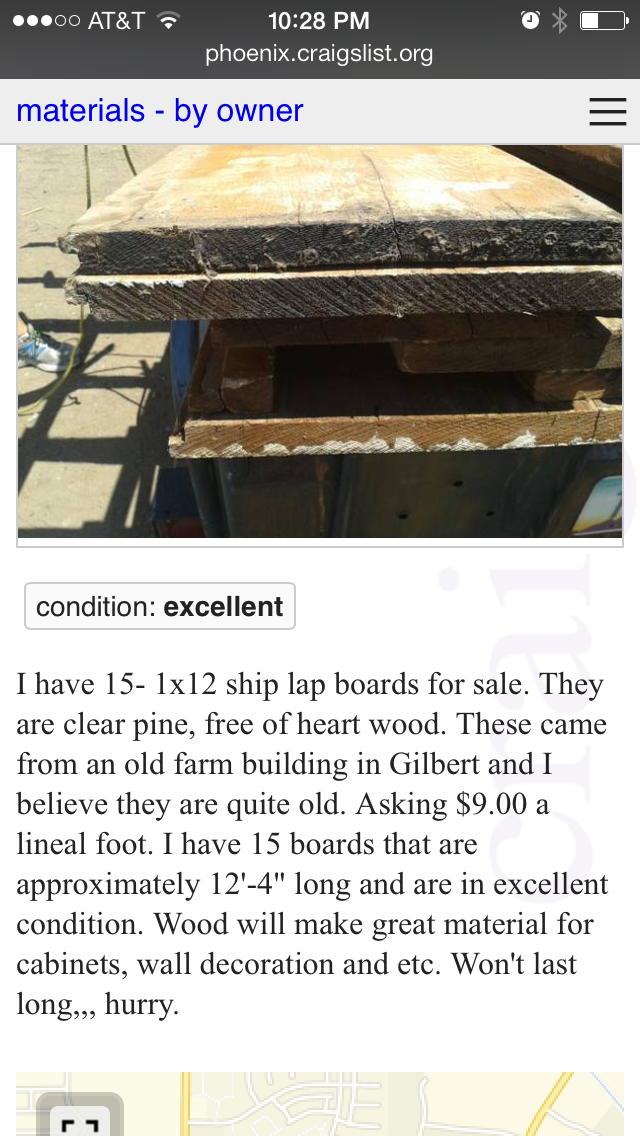
Moving on, when all the sub floors are in, You can start cutting and laying the wood planks. I ordered 8" wide by 16' long 1" thick planks (Ends up being about 3/4" thick). I ordered mine from a local company called alliance lumber. Word to the wise, make sure the wood you order is kiln dried. If it has too high of a moisture content, it will move too much. I had the option of ordering tongue in groove unfinished pine planks but I wanted a really rustic look so I went with the plain planks. Here's a picture of the closet floors with just plywood.


Here's what we learned after already laying like 800 feet. You need to push the planks together before you staple them to the floor so it's way easier to dry fit all the boards and use the walls and pry bars to smash all the planks together, then staple. We tried to push them by hand, row after row like a bunch of tools. Now we just cut all the boards for the room, squish them together and staple all the boards at once.

You can see in this next photo, the plywood floors and wood planking. We used the tub as leverage to push the planks together in my bathroom and then stapled them to the plywood. We used 1 1/5" 18 gauge staples which ended up being the perfect length.


Once all the flooring is stapled, I gave my kids a bunch of hammers and chains let them go to town. All 4 years of pent up aggression. Once it's properly distressed, I stained it. The stain took to the wood really well. Too well. It was really dark when I applied it on a stick with lambs wool. I used dark walnut stain and had to apply it on my hands and knees with a hand applicator to get the coloring how I liked it. Also back breaking. 


The lambs wool applicator was purchased at Home Depot. You use it to apply the stain and polyurethane because it leaves the least residue on the floors. You can't reuse it so buy one pad per coat of poly you want. After the stain has dried (at least 24 hours or you'll have foot prints) It will look something like this.


Then you can apply the polyurethane. I bought mine at home depot and it's fast drying (8 hours) and specifically made for floors. We only did one coat of poly on the floors because I didn't want them shiny at all. I'll do two in my bathroom just for extra protection. One coat protects but doesn't make them look too new. You have to apply the poly and stain with the direction of the wood or you can see the marks. Once the poly is dried, you can install baseboards and you're all finished! We also had to trim the doors about 3/4" and put them back up.


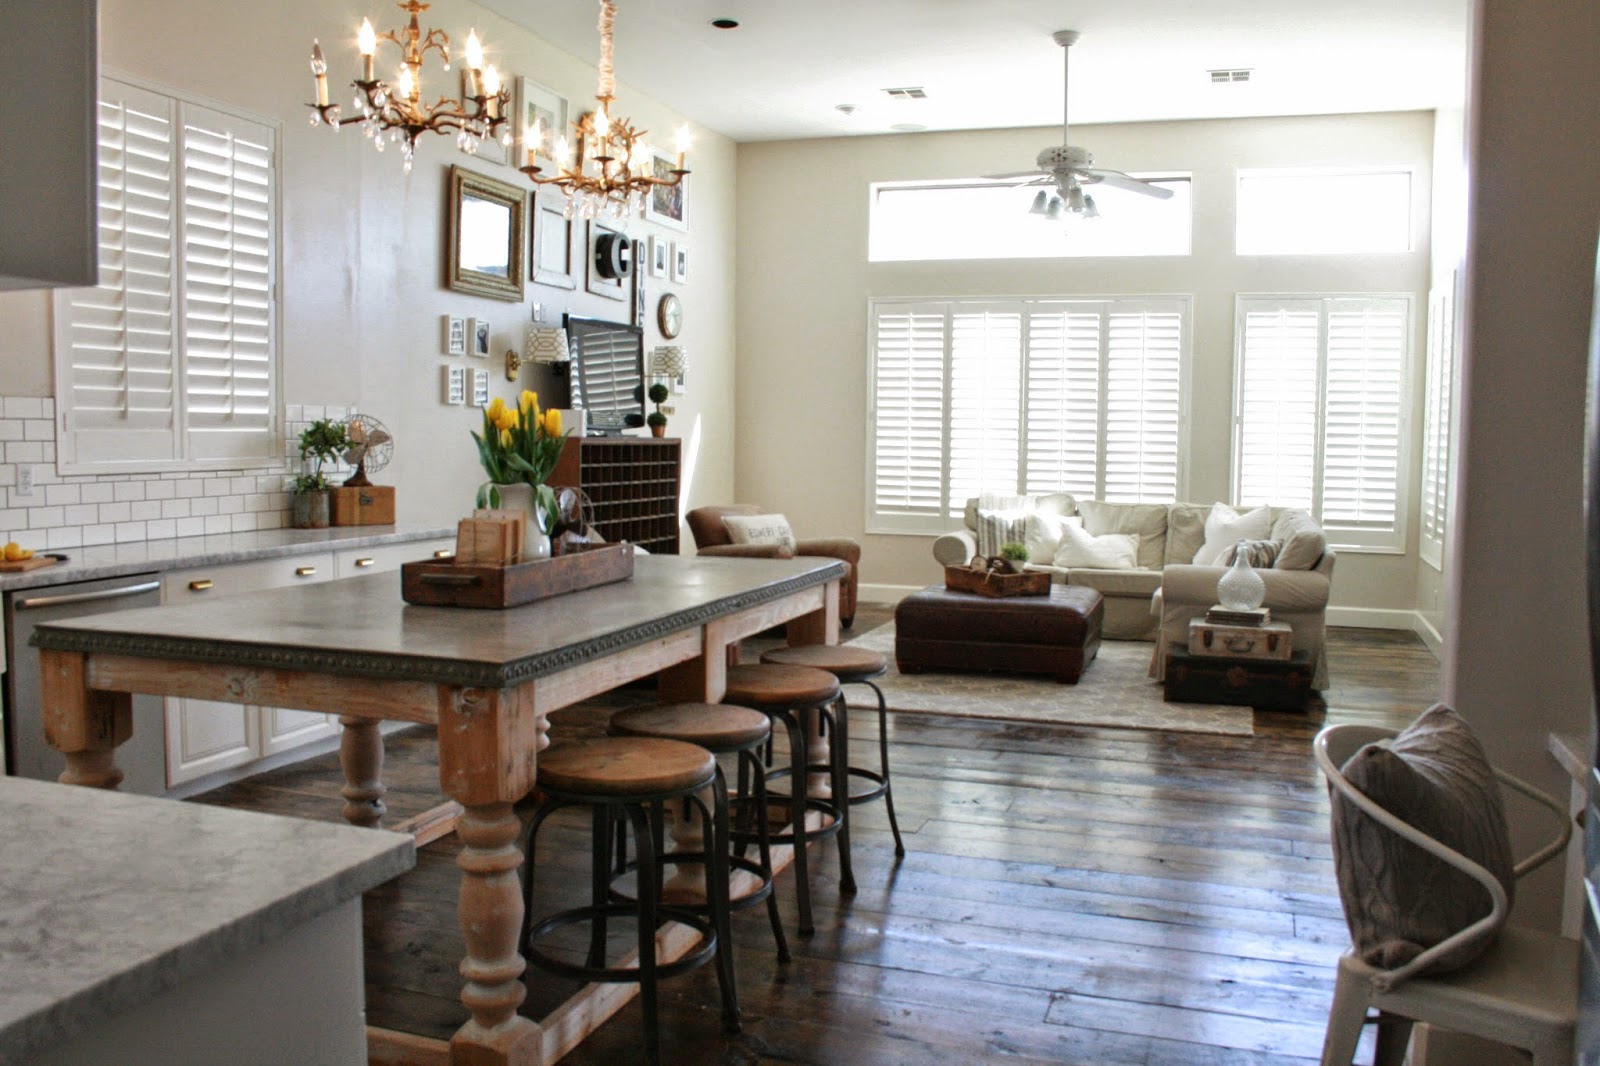
I love these floors because my kids can be really rough on them and it just makes them look older. I can sand down and stain them again unlike an engineered or laminate wood. I weighed the pros and cons of each and figured that this was the best solution for me in my area. A flooring expert will probably tell you to never do this flooring but Arizona is so super dry, it seemed to have worked just like I thought it would. And the best part, it cost me about $2 a square foot for everything. Wood, sub floors, stain, staples, poly and materials. I realize that this rustic of a look isn't for everyone but whoever buys my house can rip them out easily and already has a sub floor in place if they want something else. Here's a few before and after pictures just for fun.


If you have any questions, feel free to comment. And please read the comment section first so I don't have to answer the same question twice. I'll be posting a ton of before and after photos with my big girl camera as soon as our house hits the market.

Monday, November 3, 2014

The Holidays

I'm not going to lie. I am kind of a grinch when it comes to Halloween and even Thanksgiving. Don't get me wrong, I love seeing family and eating free candy and delicious food. And then in turn wearing stretchy pants for 4 days. But overall, they're both kind of lame holidays and Arizona doesn't even have fall foliage so it's hard to get in the spirit. In fact, I like to pretend that the calendar goes from October 31st to December 1st with a large meal somewhere in between.

The one thing that is consistent throughout both months though is the slew of guests we get. To get ready, I like to do my yearly cleaning so it appears like I'm a good housekeeper instead of the hoarder I actually am. I also like to hit up my local antique stores for a few updates for those empty walls.


I went into to The Antique Plaza on Main St in Mesa and found an antique army truck and frameless mirror. You can check them out Here. Then I ransacked my stash of decorations under the bed and came up with this little configuration. I love how when you decorate with antiques, you can walk into any antique store in the world and find something that would compliment what you already have.


I pulled a pine dresser out of my bedroom to add a little warmth and made the little pom pom garland. I added a few fake tree branches from Hobby Lobby to the metal truck and called it a day. The dark gray paint on the door is called "Anonymous" from Behr and the wreath is from Home Goods. I swiped the gold frame from my Moms garage last time I saw her. Possession is 9/10ths of the law right???
  

Sunday, September 21, 2014

Great Room Renovation

Being on TV was on my bucket list. Every once in a while I'd check HGTV and other networks to see if they had any shows I'd like to do. Renovation Realities on the DIY network was something that allowed me to be on a show without a designer telling me what to do in the space. So we interviewed and they agreed to come film us for 5 days while we did our thing.

So on spring break of this last year, a producer, sound and camera guy came to work with us. They were seriously some of the coolest people I've met. By the end of the week we were all laughing so hard, it's a miracle we got any work done. Yes, quite a few scenes were "enhanced" in the drama department. It's reality television, it has to be interesting, right? I knew the way they edit it could make me look like a totally crazy person but it wasn't that bad.  Anyways, I'm sure you want to get to the details so here goes. Here is what the great room looked like right when we bought the house.


The first day of the renovation was all demolition and the concrete counter top. Ideally, we would have poured the counter top in place but that wasn't really an option since we hadn't even built the island yet, not to mention the floors weren't down. And we needed at least 3 days for the concrete to dry. The concrete mix we got was a specially formulated powder that is specifically for counters from Lowes. It dries faster, harder, and sturdier making it ideal for our job. I ordered the egg and dart mold for the edge from THIS Utah based company. We then built the mold, finish nailed the rubber edging on, caulked it and then sprayed the crap out of it with cooking spray. Butter flavored ;) (If you saw the show, you know this didn't work. I'll explain later how we finally got the concrete to work for us.)

Then we beat up a ton of stuff. I wish I would have taken pictures while we were doing it, but I guess you have a whole episode showing you those. Demo was my favorite part. I love breaking crap. There is something so therapeutic about hitting things with a sledgehammer. After the carpet, tile, built ins, and island were up, it was time for us to put up drywall and mud. This was by far  the CRAPPIEST part. I normally would have hired this part out, but.... you know, we had to.

After that was laying the flooring. I've talked about this on my IG a lot but here it is for you. We wanted a really rustic, really inexpensive product that would allow the kids to be crazy and still have it look good. So I ordered 6'' wide, 3/4" thick plain pine planks. They are kiln dried and are NOT tongue in groove. We installed 3/4" plywood to the concrete with glue and then stapled the wood planks to the plywood.  Stapling them allowed us to pry the boards that were slightly crooked closer together for minimum gaps. The total amount for flooring ended up being about $2 a square foot. That's dirt cheap if you haven't priced out flooring. After they were stapled, I stained them dark walnut from Minwax and did one coat of polyurethane. Now that I've lived with it for a while, I'm still pretty happy but I should have done 3 coats of poly after. We just didn't have the time for it. If you want perfect, pristine floors, these are NOT for you. My kids distress them and they look more aged. They get crackers in the gaps and I vacuum them out once a month or so. But they also look like they belong in an old cabin which I absolutely LOVE. And I mop once or twice a month, they hide dirt so well.

Moving on, we had beautiful carrera marble installed and I'm still in love. The biggest problem I've had has been slight clouding from oily foods. But again, I'm not a perfectionist so I don't even remotely care. The marble broke on one side but I think it was from a natural vein that made it weak. We haven't replaced it yet, we just kind of glued it back together. We are going to install butcher block on that side that matches the island legs some day. The backsplash is regular white subway tile from Home Depot and has a medium gray grout.  The cabinets were painted with Benjamin Moore's advanced paint. This paint is the BOMB. It has all of the good properties from other paints. It self levels like an oil, cleans up like a water based, and dries hard like an alkylid. Love, love, loved working with it. The hardware on the cabinets are from Martha Stewarts line at Home Depot. The paint color is "Chocolate Froth" from Home Depot. It's a Behr color and I love it. It's a true greige. It looks great with browns and grays. If you don't have a ton of natural light, try the color just darker, "Wheat Bread".

Ok, the island. I've gotten so many questions about this so I'll try and provide as much info as possible. Like I said before, I ordered the rubber edging mold from Expressions limited. It was the most expensive part of the island. I think the reason why it failed the first time was because it dried too fast. It was partially in the sun and it was hot for March. Once we saw that it cracked, we ordered more concrete so we could pour it in place the second time around. The island legs were spun out on the lathe by my husband. I bought the 6" thick wood from a guy on craigslist who pulled reclaimed beams out of a renovation. We used a silhouette screwed to a board to make them all the same. I posted a video to instagram of him cutting them out a while ago. It's kind of hard to explain. Here's a bunch of after photos!


I think that's it. We are still planning on making a reclaimed hood, getting a different stove and making a few design changes to the island but other than that, I love the changes we made! If you have any more questions, feel free to comment and I'll answer it in the comments as well. I know it's so much information. Thank you for reading if you made it this far!


Wednesday, September 3, 2014

If you're reading this, I applaud your loyalty.

Sorry I've been MIA. But you guys. I forgot how to blog. For reals. It's been so long that when I started typing my blog name in my web browser, IT DIDN'T PULL UP! And then I just sat staring at my dashboard going "Well Crap" and "What does the pencil do again? Oh! Sweet!" And don't even get me started on not having auto correct.

Anywhooskis, I can think of a million reasons why I haven't blogged. Here are 3 to make my point.

 Number 1. When we moved into the new house, we immediately renovated our great room. It was being filmed for the T.V. show Renovation Realities and I'm not supposed to post pictures until it airs. Which happens to be September 20th at 9pm on the DIY network. Watch it. I'm positive you'll laugh at me at least once. And that's all I'll say about it. (ahem... disgusting sewer water right in my mouth ahem...)

 Number 2. It is way easier to post pictures to Instagram. If you don't follow me over there, you totally should. My user name is Nikki_Grandy.

 Number 3. My backspace button broke. I can't make this crap up. It's a total pain in the you know what to type anything. I literally have to highlight the whole word and start over if I misspell something or forget an apostrophe. It's so dumb.

Ok, so it's mostly because of number 3. However, as I Instagram away, I feel a void in my life. The desire to write self proclaimed witty run on sentences can't be quenched by IG, Facebook, or Twitter. Plus, my Moms getting too old to see the tiny pictures on IG, so I guess I have to post real ones, from my real camera, wearing real pants. Just kidding, I'll photo shop those in.

Moral of this story is bear with me. I intend on blogging more regularly but I may go into shock and forget my name if I don't ease back into it. I'll leave you with these amazing iphone pictures of a project my husband and I did over labor day.

The before: An old barn door from Flagstaff that had been torn down and hauled out into a field. And old Ship lap that someone listed on craigslist. She wanted $9 a linear foot for it which made the planks around $118 each. What the WHAT? Turns out, she didn't really do the math so when I offered her $20 she happily obliged.


And the after: A media console that is so perfectly rusty and chippy and functional and riddled with lead based paint. But I love it so.


Thanks for not giving up on me friends.